Classifying Polygons and Hierarchies of Shapes
When I first started teaching math in upper elementary, I really dreaded the geometry standards—specifically the ones about classifying polygons and creating hierarchies of shapes. For me personally, it was because I didn’t feel confident in my understanding of the standards and I didn’t really see the value in these standards.
But as with everything, the more I taught these standards the better I understood the standards myself, realized the power of these standards as opportunities for students to grow their critical thinking skills, and created really engaging ways for students to learn these concepts!
Let’s break down the standards and look at two high-quality activities that allow students to build a conceptual understanding of these concepts through hands-on experiences.
watch the video...
Common Core standards 5.G.3 and 5.G.4 (or whatever the equivalent of these are for your state) are a continuation of work students did in 4th grade when they started talking about the attributes of shapes.
Attributes or properties of shapes are the things that make shapes different from one another. It can be the number of sides, the length of the sides, the size of the angles, or whether or not the sides are parallel. All of these things make shapes unique.
In 5th grade, students are expected to group figures based on their properties and begin making generalizations or statements about all figures in these groups.
Standard CCSS 5.G.4 takes this a step further and asks students to create a hierarchy of two-dimensional figures based on their properties. This just means that students are using a visual representation to thoughtfully organize the ideas and groupings students discussed in the previous standard.
While these standards may not be considered core work for 5th grade math, I think of these as the ultimate critical thinking standards for students. The type of reasoning that is required to be able to classify objects and make accurate generalizations about each group is a thinking skill that will serve students well down the road.
Identifying Properties of Shapes
I wanted students to be able to focus on the attributes of 2D shapes without depending on the “it looks like this, so it must be this shape” mindset. A lot of times students don’t actually consider the individual attributes of a shape which makes classifying polygons nearly impossible!
What better way to get students to focus on the attributes of polygons than taking away their ability to actually see the shapes. I know it sounds counterintuitive, but it worked!
Most students would not look at a square and call it a rectangle because they’ve been taught since they were very young that a square looks one way and a rectangle looks another way. They likely were not taught what specific properties make a shape a rectangle or square.
When they can no longer see the shape and can only feel the shape, they really have to focus on describing a shape based on their attributes, which is the goal of the Mystery Shapes activity!
I created Mystery Shapes as a way to kick off our geometry unit by reviewing some of the work students did in 4th grade with identifying shapes by their properties. This was an essential skill as students prepared to create hierarchies of shapes later on.
Activity #1: Mystery Shapes
To set up the Mystery Shapes activity (which you can download for free below), you will need brown paper bags, some sort of stuffing or filler to put into the bags, and pattern blocks. I used the shredded crinkly paper that you typically find in an Easter basket as my filler!
Begin filling each bag with whatever you got as your filler. The filler is just to keep kids from easily being able to look in the bag and see the shape. I’ve used tissue paper before and it worked just as well.
Use the included “bag tags” to label half of the bags as Mystery Bag A and half of the bags as Mystery Bag B. Place two different shapes (for example, a parallelogram and a square) in each of the bags labeled Mystery Bag A. Then, place two different shapes (maybe a trapezoid and a triangle) in each of the bags labeled Mystery Bag B. Now place these bags around the room to create stations.

Once the activity begins, students will travel to the stations in pairs and reach in the bag to feel each shape in order to answer the questions on their activity sheet. For example, students might feel the trapezoid and notice that it has four sides, only one pair of parallel sides, and that two of the sides feel about the same length. They may comment on the angles of the shape as well.
Students weren’t allowed to pull the shapes out of the bag to look at them until both partners had finished one side of the activity sheet. Once they were done at a bag, they could go to another open bag that was different from the one they just completed.
By the end of the activity, students will have explored at least 4 different figures and had time to really discuss and focus on the properties of each shape. Once they’ve refreshed their brains on what attributes make figures unique, they’ll be ready to begin classifying shapes and creating hierarchies.
Creating Hierarchies of Shapes
Hierarchies of shapes may sound fancy and look complicated, but it is really just creating groups based on characteristics. The reason this is tricky is that most students don’t know what a hierarchy is or how it functions. Before asking students to create hierarchies using shapes, I decided to introduce hierarchies using objects they were familiar with and were easy to talk about!
Activity #2: Hierarchy of Chips
There are many ways to do this activity and you can modify it however you’d like, but I am going to share with you how I’ve done it. To prepare for the activity, I bought a few things…
Regular Doritos
Cool Ranch Doritos
Oreo Cookies
Baby Utensils (hey, it’s what I had on hand!)
Remember, you can use whatever items work for you!
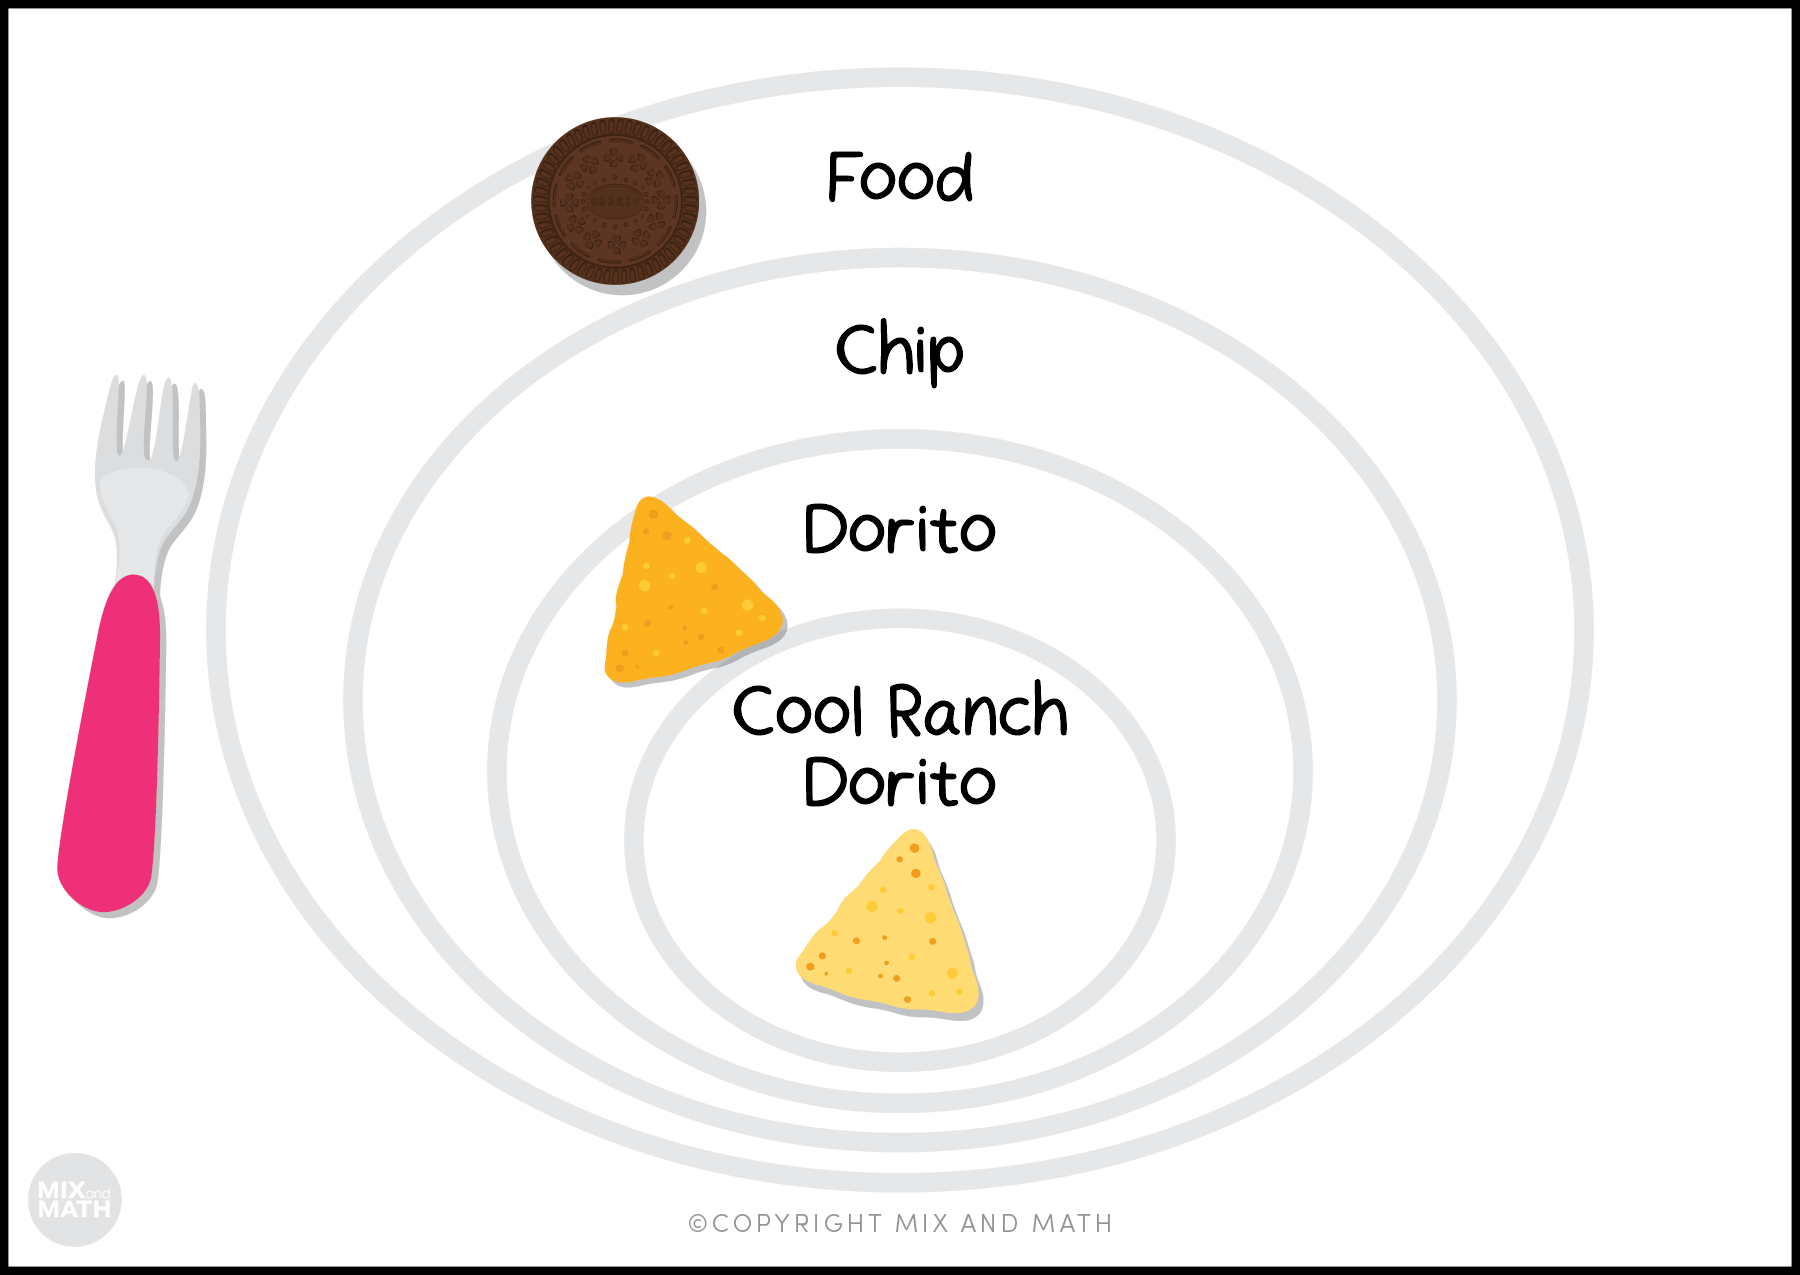
I got the activity started by asking students what the most general name would be for the Cool Ranch Dorito. Students ultimately came up with the word “food.” Then I asked them to get a little more specific. We agreed upon “chip.” Even more specific, would be “Dorito.” Lastly, the most specific we could get with labeling the object would be “Cool Ranch Dorito.”

Next, we determined where the other three objects would fall in the hierarchy we were creating. A regular Dorito could be categorized as food. It could also be categorized as a chip and as a Dorito too. BUT it cannot be classified as a Cool Ranch Dorito, so it falls just outside the center circle of our hierarchy.

The Oreo cookie can be categorized as food, but it cannot be categorized as a chip. Because it cannot be categorized as a chip, we don’t need to check with any of the further categories because all other categories in our hierarchy have the same characteristics as chips, which we’ve already identified the cookie doesn’t have.

Lastly, we talked about the baby fork. This item didn’t make it inside any of the categories because it is not a food item, which means it cannot be any of the subcategories of our hierarchy, which are all foods.
At this point, students have created a hierarchy with their chips, which they can constantly refer back to when they start working with polygons.
One of the things that is the most confusing for students to grasp is the idea that all squares are rectangles but not all rectangles are squares. This is challenging for most adults to wrap their brains around too!
Going back to our Hierarchy of Chips… Are all Doritos chips? YES! Are all chips Doritos? No. Get students talking about why that is, referring back to their hierarchy as needed.

Students know that rectangles have two pairs of sides of equal lengths, two pairs of parallel sides, and four right angles. But guess what? A square has all of those same attributes, so a square is just a specific type of rectangle, just like a Dorito is a specific type of chip. There is something additional that sets squares apart from all the other rectangles and that is that all four sides are equal.
Doesn’t that just make so much more sense?
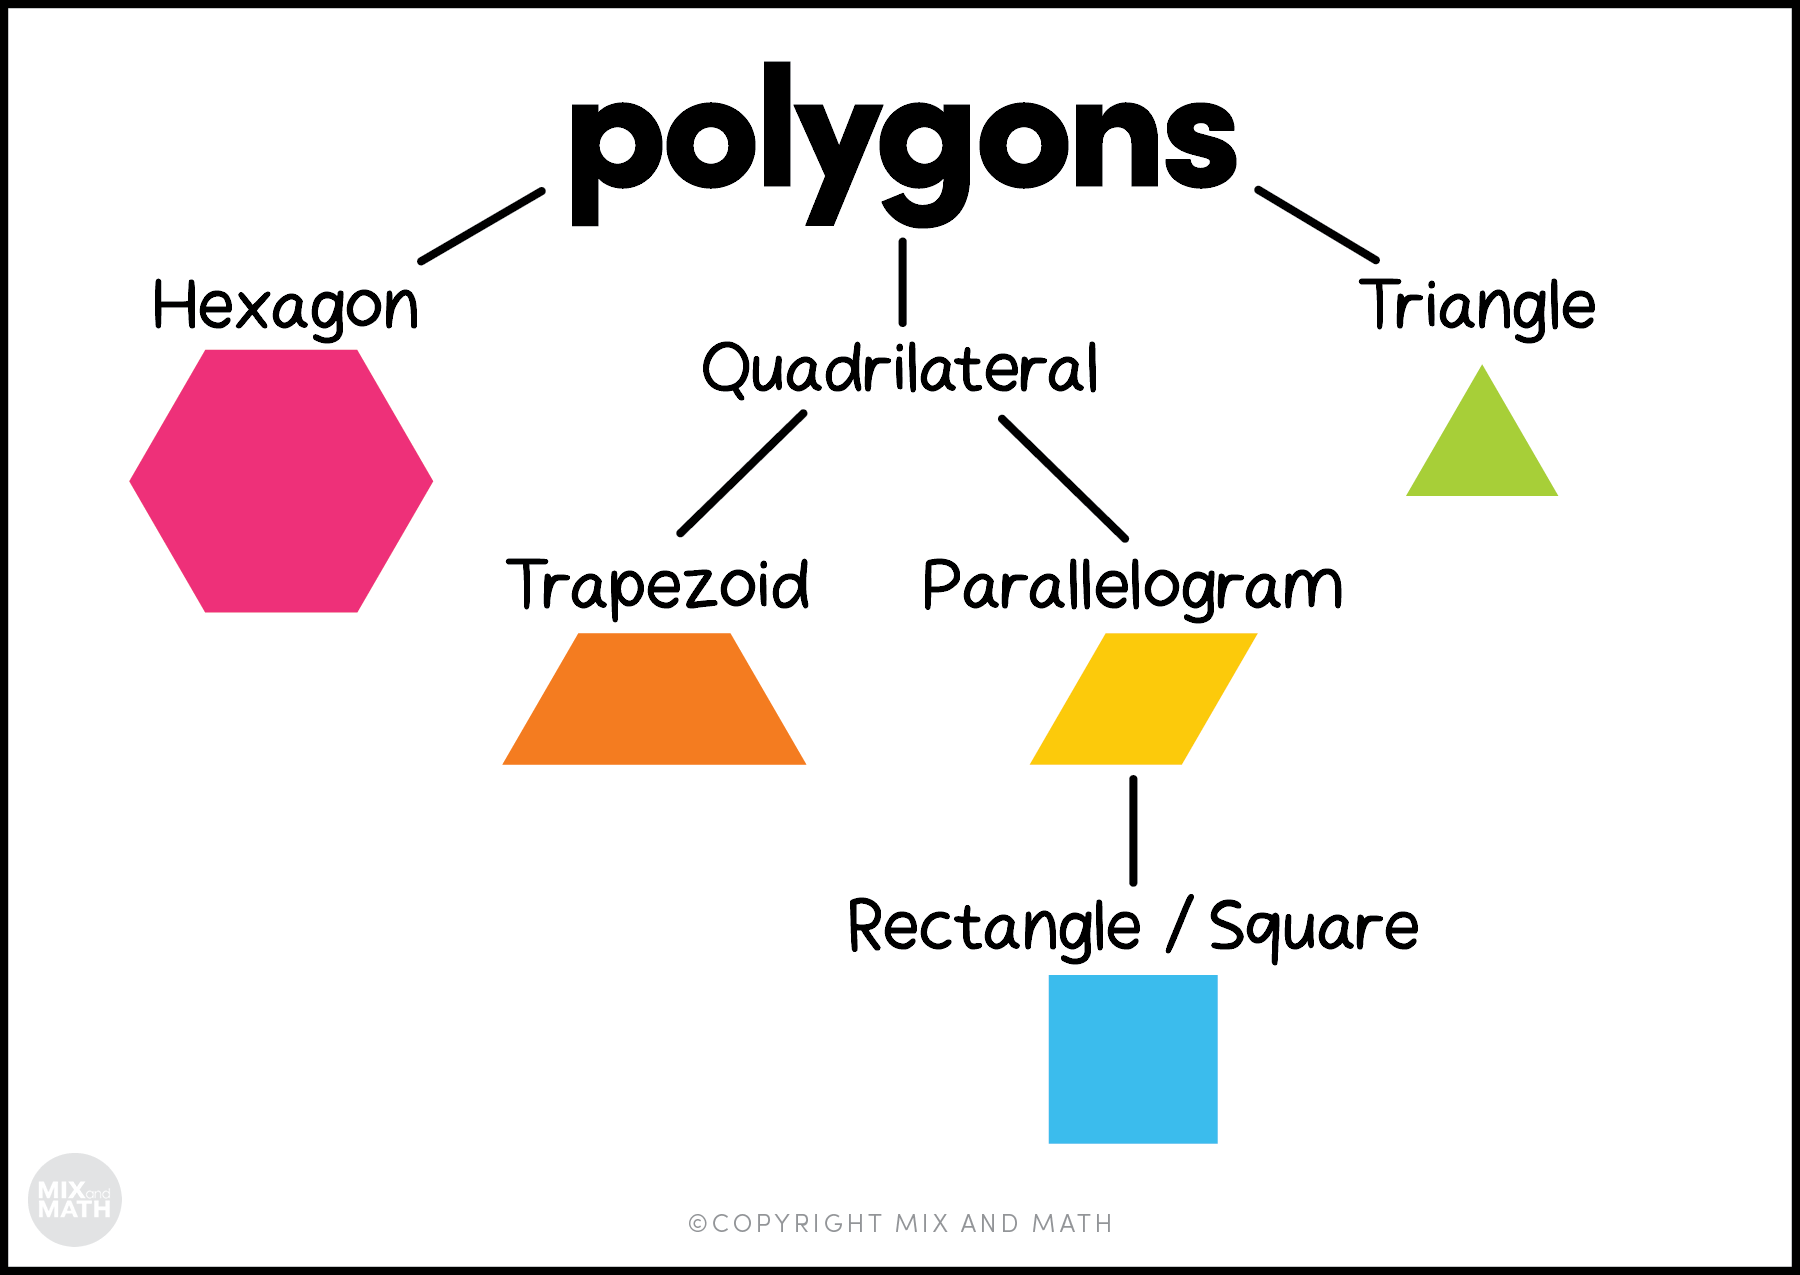
Now that students understand what a hierarchy is and can have these types of discussions about the groups within the hierarchy, try replacing the chips with pattern blocks or cutouts of other shapes and begin doing the same activity but this time instead of talking about the characteristics of random objects, talk about the attributes of shapes.
You can do this with the big category circles like we did with the food and household objects, or you can create a hierarchy that looks more like a flow chart. This layout is especially useful when you have shapes that begin splitting off into different categories.
I hope these activities are helpful in giving you some meaningful and engaging ways to make what could be a really boring and confusing standard more exciting and understandable for students! Don’t forget to download your free Mystery Shapes activity above!